
신입사원이 회사에 입사하면 IT 기술자는 해당 사용자의 계정을 Active Directory에 생성해야 합니다. 이후 IT 담당자는 각 신입을 환영하고 도메인에 로그인할 수 있도록 도와줍니다. 이 글에서는 PowerShell 스크립팅을 사용해 이 절차를 자동화하는 방법을 보여드리겠습니다. 필요에 맞게 이 스크립트를 편집해도 좋습니다.
이 블로그 게시물에서는 다음 세 가지 주제를 다룹니다:
- 이메일 비밀번호를 보안 문자열(secure string)로 읽고, 암호화된 문자열로 변환한 다음 일반 사용자가 읽을 수 없도록 텍스트 파일에 저장합니다. 이후 스크립트가 이를 읽고 다시 보안 문자열 객체로 되돌려, 후속 이메일 메시지 cmdlet에서 자격 증명(credential)으로 사용합니다.
- 지난 24시간 동안 AD에 새로 추가된 사용자를 식별하는 스크립트를 만들고, Gmail의 SMTP 서버를 사용해 이들에게 환영 이메일을 보내세요.
- PowerShell을 사용하여 작업 스케줄러(Task Scheduler)에서 매일 오전 12:00에 스크립트를 실행하도록 예약합니다.
이 글에서는 다음 cmdlet을 사용했습니다. 각 cmdlet의 자세한 내용은 Technet 웹사이트에서 확인할 수 있습니다.
- Read-Host (명령줄에서 Gmail 사용자 비밀번호로 보안 문자열(secure string)을 읽기 위한 용도)
- Send-MailMessage (SMTP 서버를 사용하여 이메일 메시지를 보내기 위한 기능)
- Get-Date (현재 날짜와 시간을 가져오기 위한 기능)
- Get-Content (파일에서 암호화된 비밀번호를 읽기 위한 기능)
- Get-ADUser (AD에서 새로 추가된 사용자를 가져오기 위한 기능)
- New-ScheduledTaskTrigger (새 예약 작업 트리거를 생성하기 위한 기능)
- Register-ScheduledTask (작업 스케줄러에서 새 작업을 예약하기 위한 명령)
이 스크립트를 Windows Server 2016에서 실행했습니다. 환경에 맞게 필요에 따라 편집할 수 있습니다. 다음 세 단계를 따라 모두 정상적으로 작동시키세요.
1단계. 텍스트 파일에 Gmail 비밀번호를 암호화된 문자열(Encrypted String)로 저장하기
관리자 권한으로 PowerShell을 열고 다음 cmdlet을 실행하세요. 이 명령은 비밀번호를 보안 문자열(Secure String)로 입력하도록 요청한 다음, 이를 암호화된 문자열로 텍스트 파일에 저장합니다.
Read-Host -AsSecureString | ConvertFrom-SecureString | Out-File “C:Userssecurepassword.txt”
2단계. .ps1 확장자를 가진 파일로 스크립트를 저장하기
메모장을 열고 다음 코드를 복사하여 붙여넣으세요. 파일을 FindOutADUsers.ps1로 저장합니다.
      ##Beginning of functions

Function Send-Email {

Param ($Email, $Credential,$attachment)

$From = "karim.buzdar@gmail.com"
$subject = "Welcome to yourdomain.com"
$SMTPServer = "smtp.gmail.com"
$SMTPPort = "587"

### Beginning of email body

$Body = "Dear User,<br><br>"
$Body += "Welcome to yourdomain.com <br><br>"
$Body += " This email will help you log in to your domain services. Follow these steps to log in to your domain: <br><br>"
$Body += "Step 1. Enter your username <br><br>"
$Body += "Step 2. Enter your password, and press enter <br><br>"
$Body += " Please check the attached screenshot. If you have any problems, please call the help desk at following number: <br><br>"
$Body += "<b>Extension No: 121</b><br><br>"
$Body += "Regards,<br><br>"
$Body += "Yourdomain.com Helpdesk"

### End of email body

Send-MailMessage -from $From -to $Email -Subject $subject -BodyAsHtml $Body -Attachments $attachment -SmtpServer $SMTPServer -Port $SMTPPort -Credential $Credential -UseSsl

}

### End of Functions

##### Beginning of main function

$When = ((Get-Date).AddDays(-1))
$UserName = "karim.buzdar@gmail.com" #Gmail username which is used for sending an email
$Password =  Get-Content "C:UsersAdministrator.YOURDOMAINDesktopFindOutADUserssecurepassword.txt" | ConvertTo-SecureString  #Reading a secure password from file and reversing it back into a secure string object
$Credential = New-Object -TypeName System.Management.Automation.PSCredential -ArgumentList ($UserName, $Password) #PSCredential for send-mail message cmdlet
$Attachment = "C:UsersAdministrator.YOURDOMAINDesktopFindOutADUsersScreenshot.png" #Image sending as an attachment with email


foreach ($EmailAddress in Get-ADUser -filter {(whencreated -ge $When)} -Properties emailaddress | Select -ExpandProperty emailaddress) #Iterating over each email of users

{

Send-Email -Email $EmailAddress -Credential $Credential -attachment $Attachment

Write-Host "Email sent: $EmailAddress"

}

### End of main function
3단계. 작업 스케줄러를 사용해 스크립트를 예약합니다
메모장에서 새 파일을 만드세요. 아래 스크립트를 붙여넣고 .ps1 확장자로 저장합니다.
      $Trigger= New-ScheduledTaskTrigger -At 12:00am -Daily #Trigger the task daily at 12 AM
$User= "yourdomainadministrator"
$Action= New-ScheduledTaskAction -Execute "PowerShell.exe" -Argument
"C:UsersAdministrator.YOURDOMAINDesktopFindOutADUsersFindOutADUsers.ps1"

Register-ScheduledTask -TaskName "FindOutADUsers" -Trigger $Trigger -User $User -Action $Action -RunLevel Highest -Force
관리자 권한으로 PowerShell에서 위 스크립트를 실행하면 완료입니다!
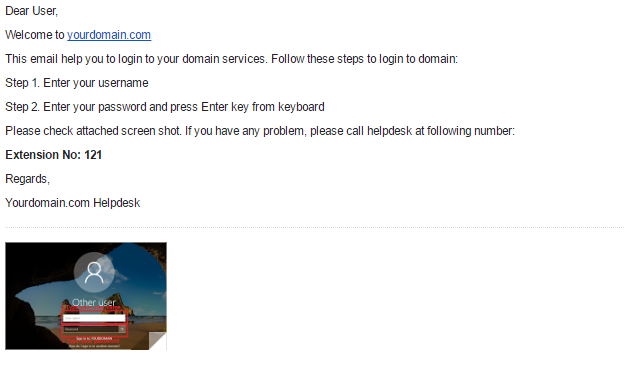
예약된 작업이 성공적으로 실행되면 Active Directory에 새로 추가된 사용자는 다음 이메일을 받게 됩니다:
이 글이 도움이 되길 바랍니다. 피드백과 의견은 언제나 환영합니다. 특히 이 스크립트에서 무언가가 제대로 작동하지 않는 경우에는 더욱 환영합니다. 행운을 빕니다!
공유하기
더 알아보기
저자 소개

Karim Buzdar
지원 엔지니어
서버 인프라 분야의 IT 엔지니어이자 Microsoft Certified Solutions Associate (MCSA)입니다. 기술 저자로서 Karim은 Microsoft Directory Services와 PowerShell에 집중합니다.