
기본(네이티브) 감사
- Powershell ISE를 여세요.
- 다음 스크립트를 실행하고 “OutFile” 및 “RootPath” 필드를 조정하십시오:
      $OutFile = "C:\Temp\Permissions.csv" # Insert folder path where you want to save your file and its name
$RootPath = "\\Pdc\Shared" # Insert your share directory path
$Header = "Folder Path,IdentityReference,AccessControlType,IsInherited,InheritanceFlags,PropagationFlags"
# $Header = "Folder Path,IdentityReference,AccessControlType,IsInherited,InheritanceFlags,PropagationFlags,FilesystemRights"
$FileExist = Test-Path $OutFile
If ($FileExist -eq $True) {Del $OutFile}
Add-Content -Value $Header -Path $OutFile
$Folders = dir $RootPath -recurse | where {$_.psiscontainer -eq $True}
foreach ($Folder in $Folders){
$ACLs = get-acl $Folder.fullname | ForEach-Object { $_.Access }
Foreach ($ACL in $ACLs){
$OutInfo = $Folder.Fullname + "," + $ACL.IdentityReference + "," + $ACL.AccessControlType + "," + $ACL.IsInherited + "," + $ACL.InheritanceFlags + "," + $ACL.PropagationFlags
# If you need detailed file system rights in your report, add the following at the end of previous line:
# + "," + ($ACL.FileSystemRights -replace ',','/' )
Add-Content -Value $OutInfo -Path $OutFile
}}
- 스크립트가 생성한 파일을 Microsoft Excel에서 엽니다:
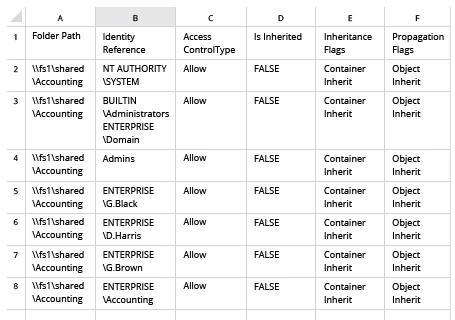
Netwrix Auditor for Windows File Servers
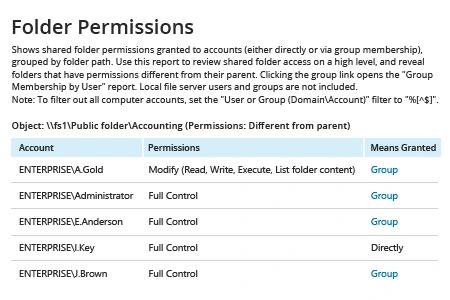
- Netwrix Auditor를 실행한 다음 → “Reports”로 이동 → “File Servers”를 열기 → “File Servers – State-in-Time”로 이동 → “Folder Permissions” 보고서를 선택합니다.
- “Object UNC Path” 필터에서 파일 공유의 경로를 지정합니다(예: “\\Myserver\Myshare”).
- “보고서 보기”를 클릭하세요.
이메일로 보고서를 정기적으로 받으려면 “구독” 옵션을 클릭한 다음 일정과 수신자를 지정하기만 하면 됩니다.
공유하기