
原生审计
- 运行 eventvwr.msc → Windows Logs → 右键单击“Security”日志 → 属性:
- 确保已选择“启用日志记录(Enable logging)”复选框
- 将日志大小至少增加到 1GB。
- 将保留方式设置为“按需覆盖事件(Overwrite events as needed)”。
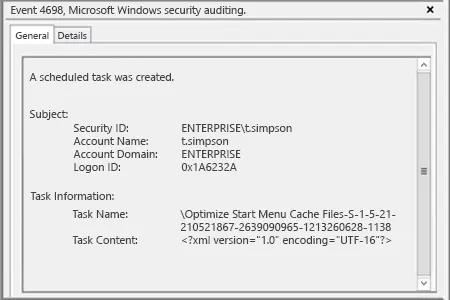
- 打开“事件查看器”,在“安全(Security)”日志中搜索 4698 事件 ID,以查找最近创建的计划任务。
- 为了在每次创建计划任务后立即生成告警,你需要通过设置你的参数来编辑下面的 PowerShell 脚本,并将其例如保存为 detectst.ps1(请按注释操作):
      $Subject = "New Scheduled Task Has Been Created" # Message Subject
$Server = "smtp.server" # SMTP Server
$From = "From@domain.com" # From whom we are sending an e-mail(add anonymous logon permission if needed)
$To = "To@domain.com" # To whom we are sending
$Pwd = ConvertTo-SecureString "enterpassword" -AsPlainText –Force #Sender account password
#(Warning! Use a very restricted account for the sender, because the password stored in the script will be not encrypted)
$Cred = New-Object System.Management.Automation.PSCredential("From@domain.com" , $Pwd) #Sender account credentials
$encoding = [System.Text.Encoding]::UTF8 #Setting encoding to UTF8 for message correct display
#Powershell command for filtering the security log about created scheduled task event
$Body=Get-WinEvent -FilterHashtable @{LogName="Security";ID=4698;} | Select TimeCreated, machinename, @{n="Task Creator";e={([xml]$_.ToXml()).Event.EventData.Data | ? {$_.Name -eq "SubjectUserName"} |%{$_.’#text’}}},@{n="Scheduled Task Name";e={([xml]$_.ToXml()).Event.EventData.Data | ? {$_.Name -eq "TaskName"}| %{$_.’#text’}}} | select-object -first 1
#Sending an e-mail.
Send-MailMessage -From $From -To $To -SmtpServer $Server -Body "$Body" -Subject $Subject -Credential $Cred -Encoding $encoding,/p>
- 运行“任务计划程序” → 创建新的计划任务 → 输入其名称 → “触发器”选项卡 → 新建触发器 → 设置以下选项:
- 在事件时开始任务
- 日志 – 安全
- 来源 – 空白
- 事件 ID – 4698。
- 转到“操作(Actions)”选项卡 → 使用以下参数创建新操作:
- 操作 – 启动程序
- 程序脚本:powershell
- 添加参数(可选):-File "我们脚本的路径"
- 单击“确定(OK)”。
- 现在,您将通过电子邮件收到通知,告知在您的 Windows 服务器上创建的每一个计划任务。邮件将包含计划任务创建时间、名称、创建该任务的计算机名称以及创建者的姓名。
Netwrix Auditor for Windows Server
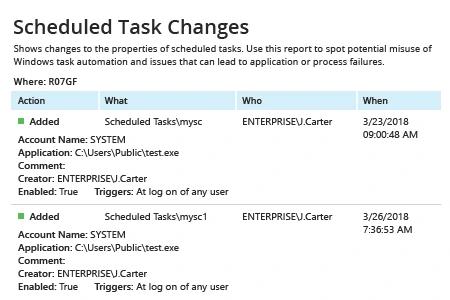
- 运行 Netwrix Auditor → 依次进入 “Reports” → “Windows Server” → “Windows Server Changes” → 选择“Scheduled Task Changes”报告 → 单击“View”。
要通过电子邮件定期接收报告,请单击“Subscribe”按钮,并选择您偏好的计划。
要在计划任务创建时创建即时警报:
- 从 Netwrix Auditor 的主页导航到“Alerts”→ 点击“Add”→ 指定警报的名称。
- 导航到“Recipients”→ 点击“Add Recipient”→ 为警报指定一个电子邮件地址。
- 导航到“Filters”→ 调整以下筛选条件:
- 筛选条件 = “What”
运算符 = “Contains”
值 = “Scheduled Tasks” - 筛选条件 = “Action”
运算符 = “Equals”
值 = “Added”
- 筛选条件 = “What”
- 单击“添加”以保存警报。
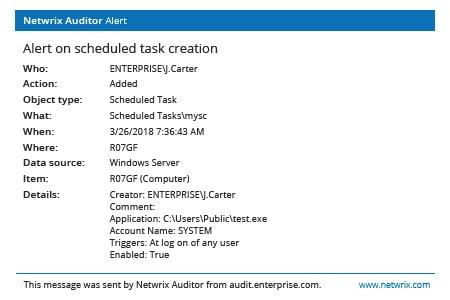
只要有人创建计划任务,你将收到类似的警报:
分享到