
사용자가 컴퓨터에 로그인하고 네트워크 및 도메인 기반 리소스에 액세스하려면, 해당 컴퓨터는 Active Directory 환경의 구성원이어야 합니다. 이 가이드에서는 컴퓨터 계정과 관련된 일상적인 작업을 자동화하는 방법을 알아봅니다. 예를 들어 계정을 손쉽게 생성하고, 이름을 변경하며, 제거하는 방법 등을 다룹니다.
이를 통해 PowerShell 을 사용해 다음 컴퓨터 계정 관리 작업을 수행하는 방법을 배우게 됩니다:
- 컴퓨터를 도메인에 조인(Join)하기
- 여러 컴퓨터를 도메인에 조인(Join)하기
- PowerShell로 도메인에서 컴퓨터 제거하기
- AD에서 컴퓨터 개체 만들기
- CSV 파일에서 컴퓨터 계정 만들기
- AD에서 컴퓨터 삭제
- 목록을 사용해 컴퓨터 계정 삭제
- PowerShell로 Active Directory의 오래된 컴퓨터 계정 제거
- 컴퓨터 이름 바꾸기
- 컴퓨터 이름 바꾸고 도메인에 조인
- AD 컴퓨터 계정 비활성화
- 목록을 사용해 컴퓨터 계정 비활성화
- AD 컴퓨터 계정 재설정
PowerShell ISE는 PowerShell 스크립트를 작업하는 데 가장 적합한 도구입니다. “Windows+R”을 누른 다음 실행(Run) 창에 “runas /profile /user:Administrator PowerShell_ISE”를 입력하여 PowerShell ISE 도구를 관리자 권한으로 시작하세요. (또는 PowerShell ISE 아이콘을 마우스 오른쪽 버튼으로 클릭하고 “관리자 권한으로 실행” 옵션을 선택할 수도 있습니다.) 메시지가 표시되면 관리자 비밀번호를 입력합니다.
AD와 해당 개체를 작업하기 전에 Windows PowerShell용 Active Directory 모듈을 가져와야 합니다. Microsoft Windows Server 2008 R2에서는 다음 명령을 실행하여 이 모듈을 활성화해야 합니다:
Import-Module ActiveDirectory
Microsoft Windows Server 2012 이상에서는 이 모듈이 기본적으로 사용 설정되어 있습니다.
컴퓨터를 도메인에 조인하기
가장 일반적인 작업은 컴퓨터를 도메인 컨트롤러에 조인하는 것입니다. PC를 Active Directory 도메인에 조인하려면 다음 PowerShell 스크립트를 로컬에서 실행합니다:
      $dc = "ENTERPRISE" # Specify the domain to join.
$pw = "Password123" | ConvertTo-SecureString -asPlainText –Force # Specify the password for the domain admin.
$usr = "$dcT.Simpson" # Specify the domain admin account.
$creds = New-Object System.Management.Automation.PSCredential($usr,$pw)
Add-Computer -DomainName $dc -Credential $creds -restart -force -verbose # Note that the computer will be restarted automatically.
컴퓨터가 다시 시작한 다음 도메인에 조인됩니다. 기본 컨테이너에 추가됩니다.
원격으로 컴퓨터를 DC에 조인하려면, 이 스크립트를 다음과 같이 보완해야 합니다:
      $dc = "ENTERPRISE"
$pw = "Password123" | ConvertTo-SecureString -asPlainText -Force
$usr = "$dcT.Simpson"
$pc = "R07GF" # Specify the computer that should be joined to the domain.
$creds = New-Object System.Management.Automation.PSCredential($usr,$pw)
Add-Computer -ComputerName $pc -LocalCredential $pcadmin -DomainName $dc -Credential $creds -Verbose -Restart -Force
$pc 변수와 –LocalCredential 매개변수는 컴퓨터를 도메인에 인증하는 데 사용됩니다. 이 방법을 사용하려면 로컬 컴퓨터의 방화벽을 비활성화해야 합니다.
여러 컴퓨터를 도메인에 조인하기
명령줄에서 쉼표로 구분한 목록으로 컴퓨터를 지정하거나, 텍스트 파일에서 이름을 가져오는 방식으로 도메인에 두 대 이상의 컴퓨터를 추가할 수 있습니다.
쉼표로 구분한 목록에서 컴퓨터를 지정하는 방법은 다음과 같습니다:
      $dc = "ENTERPRISE"
$pw = "Password123" | ConvertTo-SecureString -asPlainText -Force
$usr = "$dcT.Simpson"
$pc = "WKS034, WKS052, WKS057" # Specify the computers that should be joined to the domain.
$creds = New-Object System.Management.Automation.PSCredential($usr$pw)
Add-Computer -ComputerName $pc -LocalCredential $pcadmin -DomainName $dc -Credential $creds -Restart -Force
여기에서 조인(조인)해야 할 컴퓨터 목록이 들어 있는 텍스트 파일을 사용하는 방법은 다음과 같습니다:
      $dc = "ENTERPRISE"
$pw = "Password123" | ConvertTo-SecureString -asPlainText -Force
$usr = "$dcT.Simpson"
$pc = Get-Content -Path C:Computers.txt # Specify the path to the computers list.
$creds = New-Object System.Management.Automation.PSCredential($usr,$pw)
Add-Computer -ComputerName $pc -LocalCredential $pcadmin -DomainName $dc -Credential $creds -Restart -Force
PowerShell로 도메인에서 컴퓨터 제거하기
원격으로 컴퓨터를 도메인에서 제거하려면 Remove-Computer cmdlet을 사용합니다. 여기서는 도메인에서 컴퓨터를 제거하는 것이므로 로컬 자격 증명은 필요하지 않으며 ?LocalCredential 매개변수는 건너뛸 수 있습니다:
      $dc = "ENTERPRISE"
$pw = "Password123" | ConvertTo-SecureString -asPlainText -Force
$usr = "$dcT.Simpson"
$pc = "R07GF"
$creds = New-Object System.Management.Automation.PSCredential($usr,$pw)
Remove-Computer -ComputerName $pc -Credential $creds –Verbose –Restart –Force

TXT 파일의 목록을 사용해 여러 컴퓨터를 제거하려면, DC에 컴퓨터를 조인(조인)하는 위 스크립트를 사용하되 Add-Computer cmdlet을 Remove-Computer로 바꿔 주세요. 이 unjoin 작업을 완료하려면 여전히 도메인 관리자 자격 증명이 필요하다는 점에 유의하세요.
AD에서 컴퓨터 개체 생성하기
컴퓨터 개체를 만들려면 New-ADComputer cmdlet을 사용하세요. 예를 들어, 다음 cmdlet 매개변수를 실행하면 이름이 “WKS932”이고 기본 LDAP 경로 값이 적용된 컴퓨터 개체를 만들 수 있습니다:
New-ADComputer –Name “WKS932” –SamAccountName “WKS932”
CSV 파일에서 컴퓨터 계정 만들기
Active Directory로 가져와야 하는 컴퓨터 목록이 있다면, 목록을 CSV 파일로 저장하되 제목은 “computer”로 하고 그 아래 열에 컴퓨터 이름 목록을 입력하세요. 도메인 컨트롤러에서 다음 PowerShell 스크립트를 실행하여 CSV 파일에서 컴퓨터를 추가하되, “Path” 및 “File” 변수의 값이 올바르게 설정되어 있는지 확인하세요:
      $File="C:scriptsComputers.csv" # Specify the import CSV position.
$Path="OU=Devices,DC=enterprise,DC=com" # Specify the path to the OU.
Import-Csv -Path $File | ForEach-Object { New-ADComputer -Name $_.Computer -Path $Path -Enabled $True}
AD에서 컴퓨터 삭제하기
AD에서 컴퓨터 계정을 삭제하려면 Remove-ADObject cmdlet을 사용하세요. -Identity 매개변수는 제거할 Active Directory 컴퓨터를 지정합니다. 컴퓨터의 고유 이름(distinguished name), GUID, 보안 식별자(SID) 또는 Security Accounts Manager(SAM) 계정 이름으로 지정할 수 있습니다.
Remove-ADObject -Identity "WKS932"
삭제를 확인하라는 메시지가 표시됩니다.
목록을 사용하여 컴퓨터 계정을 삭제
오래된 컴퓨터 목록이 들어 있는 텍스트 파일이 있다면 PowerShell을 사용해 제거 작업을 간소화할 수 있습니다. 아래 스크립트는 TXT 파일에서 컴퓨터 이름을 읽고, 명령 체인 또는 파이프라인을 통해 해당 계정을 삭제합니다:
Get-Content C:scriptscomputersfordeletion.txt | % { Get-ADComputer -Filter { Name -eq $_ } } | Remove-ADObject -Recursive
더 나은 그룹 관리를 위해 Netwrix Directory Manager 평가판을 신청하세요
PowerShell로 Active Directory에서 오래된 컴퓨터 계정 제거
Active Directory의 사용하지 않는(유휴) 계정은 손상될 수 있으며, 그로 인해 보안 사고로 이어질 수 있으므로 이 계정들을 면밀히 모니터링하는 것이 중요합니다. 이 PowerShell 스크립트는 Active Directory를 조회하고 지난 30일 동안 로그인하지 않은 모든 컴퓨터를 반환합니다. 스크립트에서 이 기본값을 손쉽게 변경할 수 있습니다. 또한 AD를 깨끗하게 유지하기 위해 해당 계정을 제거합니다.
      $stale = (Get-Date).AddDays(-30) # means 30 days since last logon, can be changed to any number.

Get-ADComputer -Property Name,lastLogonDate -Filter {lastLogonDate -lt $stale} | FT Name,lastLogonDate

Get-ADComputer -Property Name,lastLogonDate -Filter {lastLogonDate -lt $stale} | Remove-ADComputer
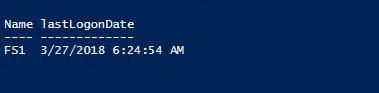
30일 이상 로그인하지 않은 컴퓨터는 1대, FS1 입니다. 시스템은 도메인에서 삭제하기 전에 확인을 요청합니다:
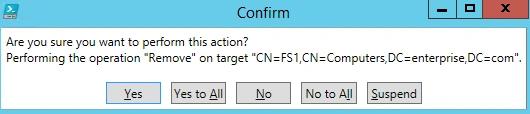
비활성 컴퓨터 계정을 삭제가 아니라 비활성화하려면 Remove-ADComputer cmdlet을 Set-ADComputer 및 -Enabled $false 매개변수와 값으로 바꾸세요.
컴퓨터 이름 변경
컴퓨터 이름을 변경하려면 Rename-Computer cmdlet을 사용하세요. 컴퓨터는 온라인 상태여야 하고 Active Directory에 연결되어 있어야 합니다.
Rename-Computer –ComputerName "FS1" -NewName "FS2"
이 스크립트를 로컬에서 실행하려면 다음과 같이 보입니다:
Rename-Computer -NewName "newname" -DomainCredential "DomainAdministrator"
컴퓨터 이름 변경 및 도메인에 조인
컴퓨터를 도메인에 조인하고 동시에 지정된 OU에 배치하도록 하면 이름 변경 스크립트를 개선할 수 있습니다. 스크립트는 도메인 컨트롤러가 아니라 대상 컴퓨터에서 실행해야 합니다.
      $NewComputerName = "Server3" # Specify the new computer name.

$DC = "contoso.com" # Specify the domain to join.

$Path = "OU=TestOU,DC=contoso,DC=com" # Specify the path to the OU where to put the computer account in the domain.
Add-Computer -DomainName $DC -OUPath $Path -NewName $NewComputerName –Restart –Force
이 스크립트는 도메인에 컴퓨터를 조인할 권한이 있는 계정의 자격 증명을 입력하라는 메시지를 표시한 다음, 컴퓨터의 이름을 변경하고 재시작한 후 도메인에 조인합니다.
AD 컴퓨터 계정 비활성화
Disable-ADAccount cmdlet을 사용하여 Active Directory의 사용자, 컴퓨터 및 서비스 계정을 비활성화하세요. 컴퓨터 계정 이름을 지정하는 경우, 이름 끝에 달러 기호($)를 붙이는 것을 잊지 마십시오. 그렇지 않으면 스크립트 실행 후 오류가 발생합니다.
Disable-ADAccount -Identity fs1$
목록을 사용하여 컴퓨터 계정 비활성화
텍스트 파일의 목록을 사용해 컴퓨터 계정을 일괄로 비활성화할 수도 있습니다:
      $Pclist = Get-Content C:scriptsComputer.txt # Specify the path to the computers list.
Foreach($pc in $Pclist)
{
Disable-ADAccount -Identity "$pc"
Get-ADComputer -Identity "$pc" | Move-ADObject -TargetPath “OU=Disabled Computers,DC=enterprise,DC=com”
}
AD 컴퓨터 계정 재설정
사용자 계정과 마찬가지로 컴퓨터 계정도 비밀번호를 사용해 Active Directory와 상호작용합니다. 하지만 컴퓨터 계정의 경우 기본적으로 30일마다 비밀번호 변경이 시작되며, 비밀번호는 도메인의 password policy 에서 제외됩니다. 비밀번호 변경은 AD가 아니라 클라이언트(컴퓨터)가 수행합니다.
컴퓨터가 무작위로 설정하기 때문에 사용자에게는 컴퓨터 자격 증명이 대개 알려져 있지 않습니다. 하지만 직접 비밀번호를 설정할 수 있습니다. 다음은 이를 위한 PowerShell 스크립트입니다:
      $pc = read-host –Prompt “Input computer name to reset“ # Specify the computer name.
$pw = read-host –Prompt “Input random characters for temp password“ –AsSecureString # Specify the password.
Get-ADComputer $pc | Set-ADAccountPassword –NewPassword:$pw -Reset:$true
결론
이제 PowerShell로 Active Directory 컴퓨터 계정을 관리하는 방법을 배웠습니다. 필요에 맞게 이러한 스크립트를 직접 개선해 사용할 수 있습니다.
컴퓨터 계정에 대한 모든 변경 사항을 면밀히 추적하는 것이 매우 중요하다는 점을 기억하세요. 그래야 원치 않는 변경이 발생했을 때 빠르게 파악하고 적절하게 대응할 수 있습니다.
Active Directory 그룹 관리 모범 사례
Active Directory 그룹 관리 모범 사례공유하기
더 알아보기
저자 소개

Jeff Melnick
시스템 엔지니어링 디렉터
Jeff는 Netwrix의 Global Solutions Engineering 분야 전(前) 디렉터입니다. 그는 오랜 기간 Netwrix 블로거이자 연사, 프레젠터로 활동해 왔습니다. Netwrix 블로그에서 Jeff는 시스템 관리 경험을 크게 향상시킬 수 있는 라이프해킹, 팁, 트릭을 공유합니다.