How to Enable Mailbox Audit Logging and Review Audit Logs in Office 365
Netwrix Auditor for Exchange
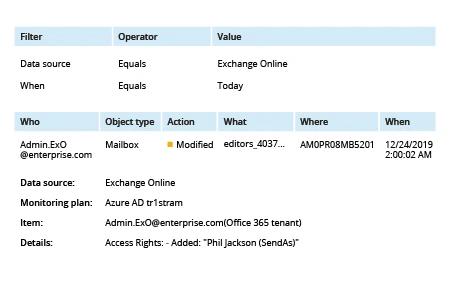
- Run Netwrix Auditor → Navigate to “Search” → Set the following filters:
- Data source Equals Exchange Online
- When Equals Today
- Click Search. By default, the output is sorted to show the most recent events first.

Learn more about Netwrix Auditor for Exchange
Native Solution
Enable auditing
You have to be an Office 365 Admin to enable auditing.
- Open the Security & Compliance Center.
- Click Search & Investigation -> Click Audit log search -> Click Start recording user and admin activity.
Note that you’ll have to wait up to 24 hours to get audit data.
Enable mailbox auditing
Mailbox auditing is included in the Audit log, but you must turn it on separately.
- To enable auditing for a single mailbox, use this PowerShell cmdlet:
Set-Mailbox -Identity "UserName" -AuditEnabled $true
- To enable auditing for all Office 365 mailboxes in your organization, run the following PowerShell commands:
      $UserMailboxes= Get-mailbox-Filter {(RecipientTypeDetails-eq 'UserMailbox')}

$UserMailboxes | ForEach {Set-Mailbox $_.Identity -AuditEnabled$true}
For more information about mailbox auditing, see the Exchange Online Mailbox Auditing Quick Reference Guide.
Review the audit log
Note that you can get mailbox auditing only for events that happened after you enabled auditing in Office 365.
- Open the Security & Compliance Center.
- Click Search & Investigation -> Click Audit log search.
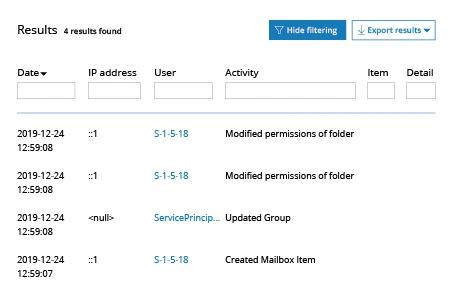
- Filter activities using Activity button on the left pane, click Search.
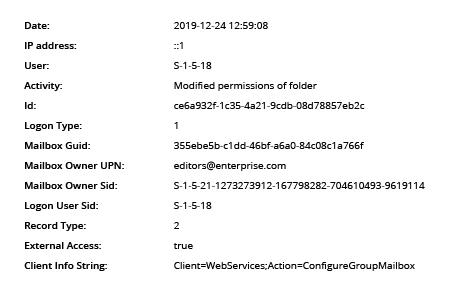
- Click activity you want to review, for example, modified permissions of folder:

- Review activity details on the right panel:

Office 365 Mailbox Audit Logging - The Easy Way
Migrating your business applications, such as Exchange Server, to the cloud can reduce maintenance costs, improve availability and deliver cost savings. However, because email often contains sensitive or business-critical information, you need to ensure that you can effectively audit your cloud environment to investigate incidents and pass compliance audits. The native Office 365 auditing toolset provides your organization with some of the features you need, including mailbox audit logging and a recoverable items folder that might be familiar from previous versions of Microsoft applications, as well as the leading-edge data governance and eDiscovery capabilities available in the Security & Compliance Center
Before January 2019, to monitor non-owner mailbox access events, permissions settings and other critical changes in Office 365, you had to enable mailbox auditing manually via PowerShell. Now, the following mailbox audit logging is enabled by default: user mailboxes access actions are audited for each logon type (Admin, Delegate, and Mailbox Owner actions). While this change contributes to security and privacy goals, native tools still have other drawbacks. In particular, the audit log is retained for only 90 days; this limited retention time means organizations can’t thoroughly investigate incidents or comply with critical regulations like HIPAA, SOX and FISMA, and shifts the burden of archiving onto IT admins’ shoulders. In addition, Office 365 stores all log entries in the Unified Audit Log; having all events logged into a single audit trail may seem convenient, but without proper parsing and filtering tools it just makes it hard to search and analyze events due to different specifics of each event source and type of event.
Netwrix Auditor for Exchange relieves the pressure from IT administrators, enabling them to review all mailbox audit events quickly without having to search and export mailbox specific audit log records, parse data with PowerShell and manually back up data. The application comes with a broad set of predefined reports and alerts that enable admins to keep all Exchange Server and Exchange Online events on their radar — everything is at your fingertips in a single-pane-of-glass interface.
Share on
