Create a rule to find one type of sensitive data:
- Open File Server Resource Manager (FRSM): Go to Server Manager -> Tools -> File Server Resource Manager.
- In FRSM, go to Classification Management -> Classification Properties -> Create Local Property.
- In the Create Local Classification Property dialog, specify the property Name and choose Yes/No for the Properties type. Click OK.
- Go to Classification Management -> Classification Rules -> Create Classification Rule.
- In General tab enter the Rule Name
- Go to the Scope tab, click Add and choose a directory. Click OK.
- Go to the Classification tab. Set Classification Method to Content Classifier and set Property to Credit Card Numbers.
- In Parameters section click Configure. For Expression Type, choose Regular Expression and enter the following expression to find MasterCard numbers: ^(5[1-5][0-9]{14}|2(22[1-9][0-9]{12}|2[3-9][0-9]{13}|[3-6][0-9]{14}|7[0-1][0-9]{13}|720[0-9]{12}))$
- Click OK.
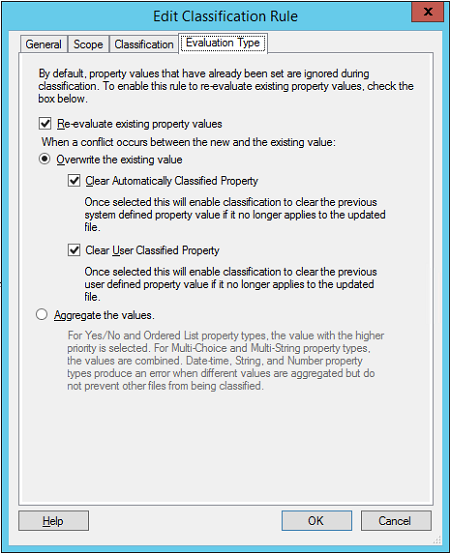
- Go to the Evaluation Type tab and specify the following:
- Enable Re-evaluate existing properties values.
- Select Overwrite the existing values.
- Check Clear Automatically Classified Properties and Clear User Classified Properties.

Then click OK.
Repeat the previous procedure to create classification rules for other types of sensitive data, such as American Express and Visa card numbers, if desired.
Execute the rules:
- Open FSRM -> Right-click Classification Rules -> Click Run Classification With All Rules Now.
- Under Run Classification, choose whether you want to run classification in the background. Click OK.
Review the results:
When the classification process is finished running, you will get a report on the files that were classified. It will have the sections shown in the table of contents below:
.png)
Since we are looking for files with credit card numbers, we’re most interested in the last section, which will look like this:
_1567071468.png)
The instructions below include setting up Netwrix Data Classification from scratch. If you have already set it up, skip to the final part that describes how to review the report.
Set up the taxonomies:
Open Netwrix Data Classification by using the following link in your web browser: http://localhost/conceptQS/. If you are accessing it from a server other than the one it is installed on, replace localhost with the server address (or name).
- Click Taxonomies -> Choose Global Settings -> Click Add to create new taxonomy setting.
- In the Add dialog, click Load -> Choose PCI DSS from the drop-down list -> Click Add.
Set up the data sources:
- Click Sources -> General -> Add.
- In the Add dialog, choose the Folder option for file shares.
- Go to the Source Configuration tab and specify the following:
- Click the “+” button next to the Folders field and specify the share address (for example, \\PDC\Shared).
- Choose All Subfolders.
- Check the Write classifications option.
- Click Add.
- Click the Pencil icon in front of the share you specified.
- Click Edit -> Check Enabled -> Click Save.
Launch the classification process:
- Go to General -> Sources and:
- Check the shares that you want to analyze.
- Click Re-Collect, for initial classification
Review your report:
To see the list of files that contain payment card information:
- Go to Reports -> Document Reports -> Document tagging.
- Pick the Taxonomy you want to see a report on (PCI DSS).
- Click Show Filters.
- In the Classification field, select the terms you need a report for (“PCI DSS>Mastercard”).
- Click Generate.
.png)
To download the list to CSV or XLSX, click the CSV or XLSX link labeled “Download all available records from the server”.