
如何使用 PowerShell 创建新的 Active Directory 用户
Aug 26, 2025
The New-ADUser cmdlet 使管理员能够 Active Directory 以精准且可扩展的方式创建用户帐户。尽管 ADUC 和 ADAC 支持单个用户创建,PowerShell 仍可通过脚本或 CSV 导入进行批量预配,因此非常适合大型环境。借助 60+ 个参数,管理员可以设置诸如 password policies、OU 放置以及自定义字段等属性。要进一步提升效率, Netwrix Directory Manager 会自动化预配,并与 HR 系统同步,以确保准确、及时的用户生命周期管理。
像 ADUC 和 ADAC 这样的工具可以让系统管理员很轻松地在 Active Directory 中创建新用户,但在进行批量用户创建时会有一定的限制。PowerShell 是用于创建 Active Directory 帐户的强大且灵活的工具,而且在大规模场景中更是表现出色。
本文博客将介绍使用 PowerShell cmdlet New-ADUser 创建新 Active Directory 用户的流程。我们将重点讲解该 cmdlet 的常见用例,并提供其完整语法,便于你进一步探索。
使用 PowerShell 创建 Active Directory 用户
使用 ADUC 和 ADAC,添加单个用户很简单,但两者都缺少批量创建用户的功能。PowerShell 提供了多种方式,不仅可以创建单个用户,还可以 批量创建 Active Directory 用户对象 。下面我们先来回顾一下将要使用的 cmdlet:New-ADUser 的语法和参数。
你可以在 New-ADUser 命令中使用某些参数,以填充最常见的用户属性。
- 使用 OtherAttributes 参数,你可以更改不与 cmdlet 参数相关的属性值。使用该参数时,请确保将属性名称用单引号括起来。
- 要创建用户,必须提供 SamAccountName 参数。
- 新用户的容器或组织单位 (OU) 由 Path 参数指定。当未使用 Path 选项时,cmdlet 会在域的默认用户对象容器中创建用户对象。
以下方法介绍了使用此 cmdlet 构建对象的多种方式:
- 使用 New-ADUser 命令时,提供常用的参数和值,并使用 OtherAttributes 参数设置任何其他值。
- 您还可以从模板创建新用户。使用 Instance 参数来创建新用户,或将现有用户复制到新的对象中。Instance 参数中使用的对象将作为模板。
- 要批量 创建 Active Directory 用户对象,请将 Import-Csv cmdlet 与 New-ADUser cmdlet 结合使用。
- 使用 Import-Csv cmdlet 导入包含对象属性列表的 CSV 文件,以构建自定义对象。
- 然后可以使用 New-ADUser cmdlet,通过将这些对象传递到其管道中来构建用户对象。
在开始之前,需要通过运行以下命令来启用 Microsoft Windows Server 2008R2/2012 及以上版本中内置的 Active Directory PowerShell 模块:
New-ADUser Cmdlet:语法
现在我们来查看 New-ADUser cmdlet 的语法:
Get-Command New-ADUser –Syntax
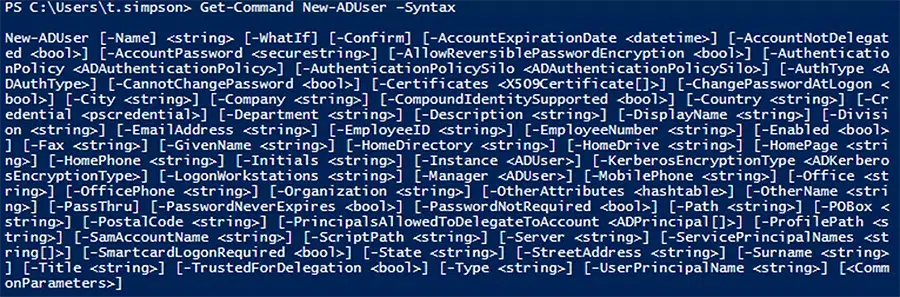
下面以同样的信息提供一种你可以按需复制并进行修改的格式:
      New-ADUser   [-WhatIf]   [-Confirm]   [-AccountExpirationDate <DateTime>]   [-AccountNotDelegated <Boolean>]   [-AccountPassword <SecureString>]   [-AllowReversiblePasswordEncryption <Boolean>]   [-AuthenticationPolicy <ADAuthenticationPolicy>]   [-AuthenticationPolicySilo <ADAuthenticationPolicySilo>]   [-AuthType <ADAuthType>]   [-CannotChangePassword <Boolean>]
   [-Certificates <X509Certificate[]>]   [-ChangePasswordAtLogon <Boolean>]   [-City <String>]
   [-Company <String>]   [-CompoundIdentitySupported <Boolean>]   [-Country <String>]
   [-Credential <PSCredential>]   [-Department <String>]   [-Description <String>]   [-DisplayName <String>]   [-Division <String>]   [-EmailAddress <String>]   [-EmployeeID <String>]   [-EmployeeNumber <String>]   [-Enabled <Boolean>]   [-Fax <String>]   [-GivenName <String>]
   [-HomeDirectory <String>]   [-HomeDrive <String>]   [-HomePage <String>]   [-HomePhone <String>]
   [-Initials <String>]   [-Instance <ADUser>]   [-KerberosEncryptionType <ADKerberosEncryptionType>]   [-LogonWorkstations <String>]   [-Manager <ADUser>]   [-MobilePhone <String>]   [-Name] <String>   [-Office <String>]   [-OfficePhone <String>]
   [-Organization <String>]   [-OtherAttributes <Hashtable>]   [-OtherName <String>]   [-PassThru]
   [-PasswordNeverExpires <Boolean>]   [-PasswordNotRequired <Boolean>]   [-Path <String>]
   [-POBox <String>]   [-PostalCode <String>]   [-PrincipalsAllowedToDelegateToAccount <ADPrincipal[]>]   [-ProfilePath <String>]   [-SamAccountName <String>]   [-ScriptPath <String>]
   [-Server <String>]   [-ServicePrincipalNames <String[]>]   [-SmartcardLogonRequired <Boolean>]
   [-State <String>]   [-StreetAddress <String>]   [-Surname <String>]   [-Title <String>]   [-TrustedForDelegation <Boolean>]   [-Type <String>]   [-UserPrincipalName <String>]
New-ADUser:参数
New-ADUser cmdlet 提供了 60 多个参数,但你不必立刻全部掌握。下面是用于创建 AD 用户帐户时最常用的参数:
Parameter | Used to |
|---|---|
|
AccountExpirationDate |
Specify the account’s expiration date |
|
AccountPassword |
Specify the account’s password |
|
AuthType |
Select the authentication type when running the command |
|
CannotChangePassword |
Prevent the account owner from changing the password (usually used for service accounts) |
|
ChangePasswordAtLogon |
Force the user to change the account password at the next login |
|
City |
Specify the city for the user account |
|
Company |
Specify the company for the user account |
|
Confirm |
Get a confirmation prompt to run the cmdlet |
|
Country |
Specify the country for the user account |
|
Credential |
Run the command with alternative credentials |
|
Department |
Specify the user’s department |
|
Description |
Specify a description for the user account |
|
DisplayName |
Specify the display name of the account |
|
EmailAddress |
Specify the account’s email address |
|
EmployeeID |
Specify the user’s employee ID |
|
Enabled |
Enable the user account |
|
Instance |
Create a user account based on an existing account, such as one with the same department and title properties as the account you are creating |
|
Manager |
Specify the manager of the user account |
|
Office |
Specify the office attribute of the user account |
|
Organization |
Specify the user’s organization |
|
OtherAttributes |
Specify the value for an attribute for which there is no corresponding parameter in the cmdlet, such as the extensionAttribute1 to 15 attributes |
|
PasswordNeverExpires |
Force the account’s password to never expire |
|
PasswordNotRequired |
Specify that the account, such as a service account, does not require a password |
|
Path |
Specify the OU path to create the user account in |
|
SamAccountName |
Specify the account’s SAMAccountName attribute, a logon name used to support clients and servers running earlier versions of Windows, such as Windows NT 4.0, Windows 95 or LAN Manager |
|
Server |
Connect to an alternate DC while running the command |
|
State |
Specify the user’s US state |
|
StreetAddress |
Specify the user’s address |
|
Title |
Specify the user’s title |
|
Type |
Specify the user object’s type, such as a normal user or an inetOrgPerson user |
|
UserPrincipalName |
Specify the account’s userPrincipalName (UPN), which is typically the name that the user will use to log on |
|
WhatIf |
See what the output of the cmdlet would be without actually running it |
使用 PowerShell 创建用户的常见场景
现在,让我们来了解一些你可能会使用 PowerShell 来预配用户账户的主要方式:
- 创建一个新的用户账户。
- 在特定的 OU 中创建用户账户。
- 创建用户并设置 cmdlet 参数未涵盖的属性。
- 创建一个 inetOrgPerson 用户。
- 基于现有的 AD 用户创建新用户。
- 使用 PowerShell 脚本批量创建用户。
- 从 CSV 文件导入用户属性,以批量创建用户。
- 使用 CSV 文件创建多个用户帐户。
创建新的用户帐户
示例 1:仅指定帐户名称
先从最简单的情况开始:只需指定其名称属性即可创建新用户帐户。例如:
New-ADUser B.Johnson
运行后将创建该用户,但不会显示任何输出。要检查用户是否已成功添加,我们可以使用以下脚本列出所有 Active Directory 用户:
Get-ADUser -Filter * -Properties samAccountName | select samAccountName
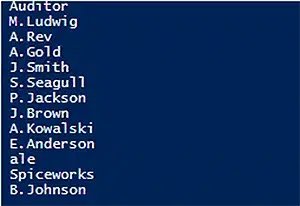
就在这里,列表中的最后一个!
不过请注意,我们刚刚创建的用户除了名称之外还有更多属性;以下属性会默认设置:
- 该账户是在“Users”容器中创建的。
- 该账户已停用。
- 该账户是“Domain Users”组的成员。
- 用户在首次登录时必须重置密码。
许多所需属性未被填充。特别是,未设置密码。
示例 2:指定其他属性
因此,让我们通过指定更多属性来创建一个真正可用的新账户:
New-ADUser -Name "Jack Robinson" -GivenName "Jack" -Surname "Robinson" -SamAccountName "J.Robinson" -UserPrincipalName "J.Robinson@enterprise.com" -Path "OU=Managers,DC=enterprise,DC=com" -AccountPassword(Read-Host -AsSecureString "Input Password") -Enabled $true
Read-Host 参数会提示你输入一个新的密码。请注意,该密码应满足你所在域的 security policy 的长度、复杂性和历史要求。
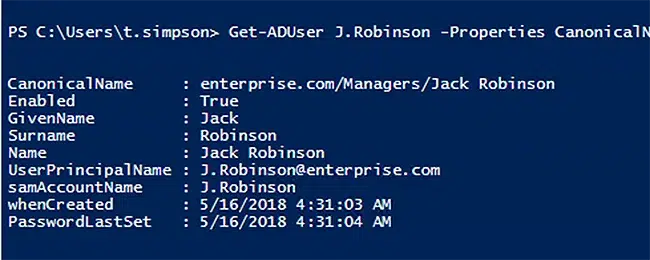
现在,让我们运行下面的 cmdlet 来查看结果:
Get-ADUser J.Robinson -Properties CanonicalName, Enabled, GivenName, Surname, Name, UserPrincipalName, samAccountName, whenCreated, PasswordLastSet | Select CanonicalName, Enabled, GivenName, Surname, Name, UserPrincipalName, samAccountName, whenCreated, PasswordLastSet
示例 3:指定更多属性
要创建包含更多属性的完整用户帐户,请使用以下命令。
New-ADUser -Name "Jason Bourne" -GivenName "Jason" -Surname "Bourne" -SamAccountName "Jason-Bourne" -AccountPassword (ConvertTo-SecureString -AsPlainText “webdir123R” -Force) -ChangePasswordAtLogon $True -Company "Versacorp" -Title "CEO" -State "California" -City "San Francisco" -Description "Test Account Creation" -EmployeeNumber "45" -Department "Engineering" -DisplayName "Jason Bourne" -Country "US" -PostalCode "94001" -Enabled $True
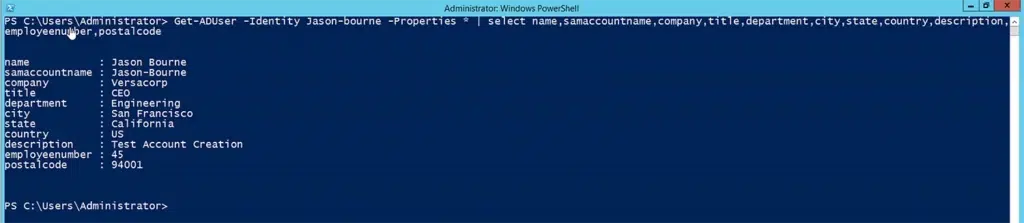
来看看新用户的一些属性:
Get-ADUser -Identity Jason-bourne -Properties * | select name,samaccountname,company,title,department,city,state,country,description,employeenumber,postalcode
在特定 OU 中创建用户帐户
如上所述,默认情况下,New-ADUser cmdlet 会在域中的 “Users” 容器中创建新用户。要在不同的 OU 中创建用户,请使用带有所需 OU 的专有名称(distinguished name)的 -Path 参数:
New-ADUser -Name "Jason Bourne" -Path "OU=NBC,DC=milkyway,DC=local" -GivenName "Jason" -Surname "Bourne" -SamAccountName "Jason-Bourne" -AccountPassword (ConvertTo-SecureString -AsPlainText “webdir123R” -Force ) -ChangePasswordAtLogon $True -DisplayName "Jason Bourne" -Enabled $True<
创建用户并设置超出 New-ADUser 参数的属性
New-ADUser cmdlet 的 60+ 个参数涵盖了新用户的常见属性,但仍有不少不常用的属性。你可以使用 -OtherAttributes 参数来为它们赋值。在本示例中,我们为 extensionattribute1 以及自定义属性 carlicense 赋值:
New-ADUser -Name "Jason Bourne" -Path "OU=NBC,DC=milkyway,DC=local" -GivenName "Jason" -Surname "Bourne" -SamAccountName "Jason-Bourne" -AccountPassword (ConvertTo-SecureString -AsPlainText “webdir123R” -Force ) -ChangePasswordAtLogon $True -DisplayName "Jason Bourne" -Enabled $True -OtherAttributes @{'extensionattribute1'="director";'carlicense'="LWG3852"}
下面所示,我们使用 Get-ADUser 命令来验证结果。
Get-ADUser -Identity Jason-bourne -Properties * | select name,extensionattribute1,carlicense

创建一个 inetOrgPerson 用户
Active Directory 中的大多数用户对象都具有类 user。不过,你也可以创建类为 inetOrgPerson 的用户对象。该类的父类是 inetOrgPerson 类有助于与某些应用程序集成,并简化将某些用户对象迁移到 Active Directory 的过程。
要创建一个 inetOrgPerson 用户帐户,只需包含 -Type 参数,并指定 inetOrgPerson 作为其值:
New-ADUser -Name "Benedict Cumberbatch" -Path "OU=NBC,DC=milkyway,DC=local" -GivenName "Benedict" -Surname "Cumberbatch" -SamAccountName "Benedict.Cumberbatch" -AccountPassword (ConvertTo-SecureString -AsPlainText “webdir123R” -Force ) -ChangePasswordAtLogon $True -DisplayName "Benedict Cumberbatch" -Enabled $True -Type iNetOrgPerson<
在下面的截图中,请注意新用户 Benedict Cumberbatch 的类型,以及我们之前创建的用户 Jason Bourne 的类型:
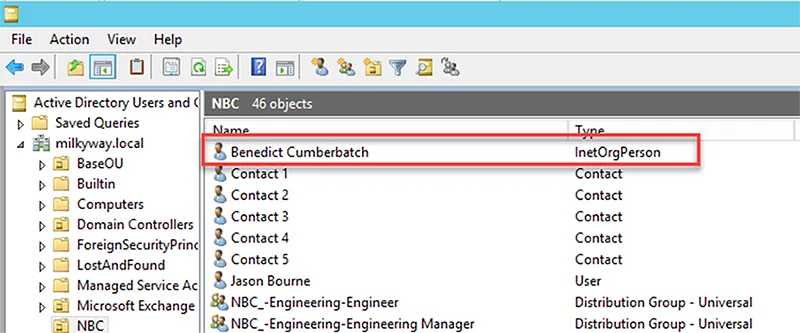
创建带密码的新 Active Directory 用户帐户
帐户将使用以下默认属性创建:
- 帐户在 “Users” 容器中创建。
- 帐户已禁用。
- 该帐户是“Domain Users”组的成员。
- 未设置密码。
- 用户必须在首次登录时重置密码。
因此,要创建一个真正可用的新帐户,我们需要使用 Enable-ADAccount cmdlet 启用它,并使用 Set-ADAccountPassword cmdlet 为其设置密码。
借助 GroupID 简化 AD 管理
了解如何使用 Netwrix 高效处理权限、组成员关系以及用户预配
那就让我们使用以下属性创建一个新账户:
名称 – Jack Robinson
名 – Jack
姓氏 – Robinson
账户名称 – J.Robinson
用户主体名称 – J.Robinson@enterprise.com
路径地址 – “OU=Managers,DC=enterprise,DC=com”
密码输入
状态 – 已启用
下面是我们将使用的脚本:
New-ADUser -Name "Jack Robinson" -GivenName "Jack" -Surname "Robinson" -SamAccountName "J.Robinson" -UserPrincipalName "J.Robinson@enterprise.com" -Path "OU=Managers,DC=enterprise,DC=com" -AccountPassword(Read-Host -AsSecureString "Input Password") -Enabled $true
Read-Host 参数会提示你输入新密码。请注意,密码应满足你域安全策略中的长度、复杂性以及历史记录要求。
现在通过运行以下 cmdlet 来查看结果:
Get-ADUser J.Robinson -Properties CanonicalName, Enabled, GivenName, Surname, Name, UserPrincipalName, samAccountName, whenCreated, PasswordLastSet | Select CanonicalName, Enabled, GivenName, Surname, Name, UserPrincipalName, samAccountName, whenCreated, PasswordLastSet
基于现有用户创建新用户
有时,你希望创建一个新用户,其几乎具有现有用户的所有相同属性。首先,我们需要基于现有用户创建一个模板。在这里,我们创建一个包含用户 Benedict Cumberbatch 的 5 个属性的模板。第二行用于设置 userPrincipalName 的值为 null,因为该属性在整个林中是唯一的。模板存储在 $temp_UserAccount 变量中。
      $temp_UserAccount = Get-ADUser -Identity Benedict.Cumberbatch -Properties State,Department,Country,City,title
$temp_UserAccount.UserPrincipalName = $null
现在我们可以创建一个新用户,使其具有来自模板的 5 个属性(通过在 Instance 参数中指定值 $temp_UserAccount),并再加上我们指定的其他几个属性:
New-ADUser -Instance $temp_UserAccount -Name 'Nelson Mendela' -SamAccountName 'Nelson.Mendela' -AccountPassword (Read-Host -AsSecureString "Input User Password") -Enabled $True
我们可以使用 Get-ADUser 命令查看新用户:
Get-ADUser -Identity Nelson.Mendela -Properties * | select `name,department,city,country,title,state
请注意,我们列出的这些属性对于新用户和 Benedict Cumberbatch 是相同的:
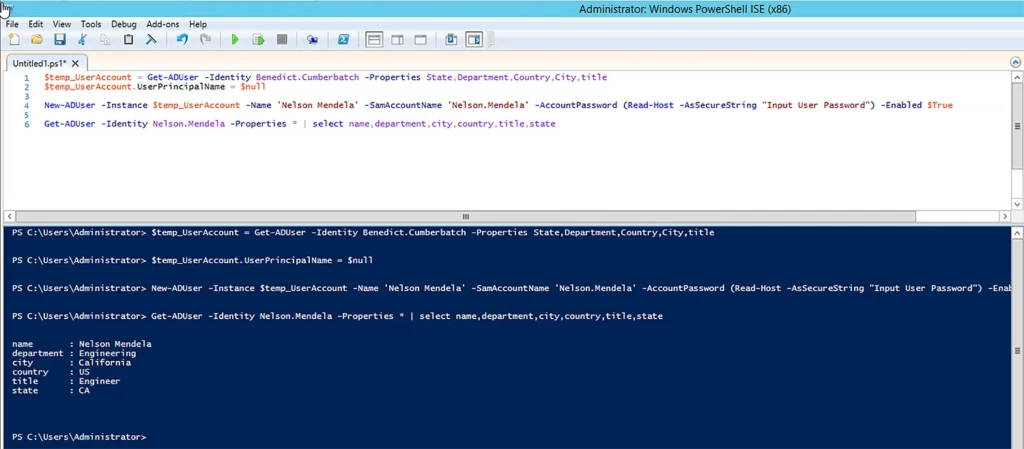
使用 PowerShell 脚本批量创建用户
现在,我们来使用 PowerShell 脚本批量创建十个相似的 Active Directory 账户。它们的用户名几乎相同,只是每个用户末尾的数字会递增。我们将为每个账户设置相同的默认密码(P@ssw0rd),并通过使用 ConvertTo-SecureString 参数,将该密码以受保护的状态发送。下面是要使用的脚本以及它创建的前两个用户:
      $path="OU=IT,DC=enterprise,DC=com"
$username="ITclassuser"
$count=1..10
foreach ($i in $count)
{ New-AdUser -Name $username$i -Path $path -Enabled $True -ChangePasswordAtLogon $true  `
-AccountPassword (ConvertTo-SecureString "P@ssw0rd" -AsPlainText -force) -passThru }
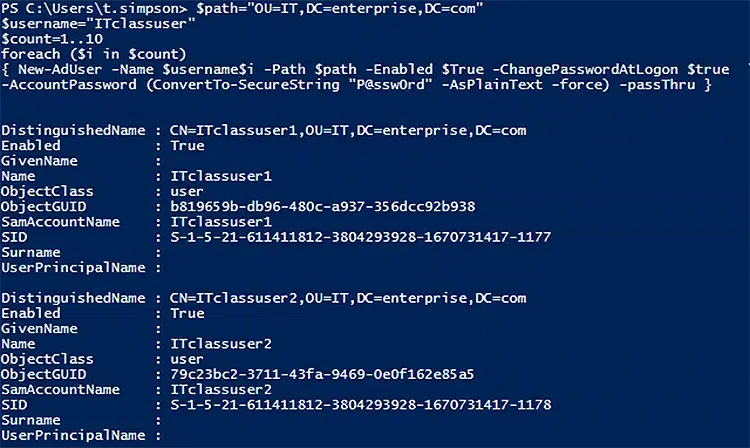
现在,让我们通过添加 Read-Host 参数,让脚本更灵活。该参数会提示我们输入要使用的“stem”用户名以及要创建的用户数量:
      $path="OU=IT,DC=enterprise,DC=com"
$username=Read-Host "Enter name"
$n=Read-Host "Enter Number"
$count=1..$n
foreach ($i in $count)
{ New-AdUser -Name $username$i -Path $path -Enabled $True -ChangePasswordAtLogon $true  `
-AccountPassword (ConvertTo-SecureString "P@ssw0rd" -AsPlainText -force) -passThru }
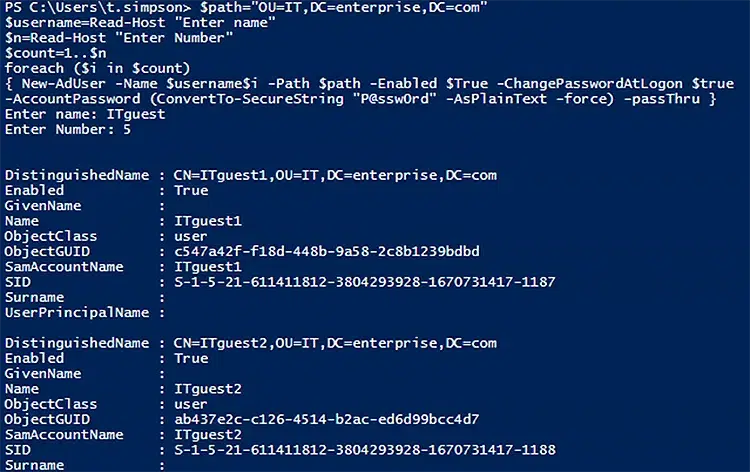
使用 PowerShell 通过 CSV 导入批量创建用户
批量创建用户的另一种选择是从 CSV 文件导入他们的属性。当你已有包含预定义个人信息(例如姓名、部门和 OU)的用户列表时,这个选项非常适合。
CSV 文件必须使用 UTF-8 编码,并且格式如下:
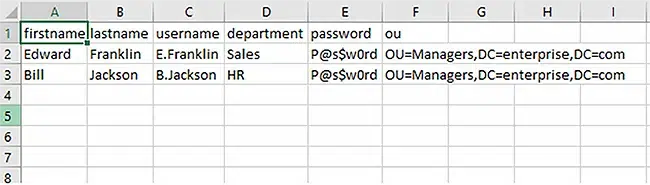
以下脚本会为 CSV 中所有尚未在 Active Directory 中拥有账号的用户创建启用的用户对象。新的账号将启用“下次登录时重置密码”选项,因此你可以使用默认密码:
      #Define path to your import CSV file location in a variable as shown in below line.
$AD_Users = Import-csv C:\scripts\newusers.csv
foreach ($User in $AD_Users)
{
       $User_name    = $User.username
       $User_Password    = $User.password
       $First_name   = $User.firstname
       $Last_name    = $User.lastname
    $User_Department = $User.department
       $User_OU           = $User.ou
       #Below if-else condition will check if the user already exists in Active Directory.
       if (Get-ADUser -F {SamAccountName -eq $User_name})
       {
               #Will output a warning message if user exist.
               Write-Warning "A user $User_name has already existed in Active Directory."
       }
       else
       {
              #Will create a new user, if user is not available in Active Directory.

        #User account will be created in the OU listed in the $User_OU variable in the CSV file; it is necessary to change the domain name in the"-UserPrincipalName" variable in the script below.
              New-ADUser `
            -SamAccountName $User_name `
            -UserPrincipalName "$Username@example.com"
            -Name "$First_name $Last_name"
            -GivenName $First_name `
            -Surname $Last_name `
            -Enabled $True `
            -ChangePasswordAtLogon $True `
            -DisplayName "$Last_name, $First_name" `
            -Department $User_Department `
            -Path $User_OU `
            -AccountPassword (convertto-securestring $User_Password -AsPlainText -Force)
       }
}
执行脚本后,我们的环境中有两位新的用户:Edward Franklin 和 Bill Jackson,位于我们的 Active Directory 域:
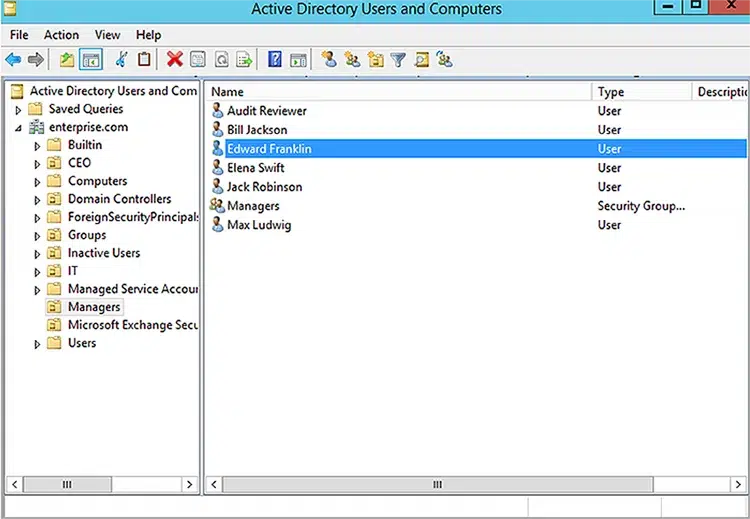
使用 CSV 文件批量创建用户帐户
通常需要每天或每周创建用户帐户。假设你的 HR 部门会以如下所示的 CSV 文件形式为你提供每位用户的详细信息:

要从该文件创建用户,首先将 CSV 文件导入到变量 $import_users, 中,并将每条记录作为单独的行:
$import_users = Import-Csv -Path c:\bulkuser.csv
然后,我们使用下面的脚本创建用户。请注意,它会从源文件中获取每个用户的密码,将其转换为安全字符串并进行加密。
$import_users | ForEach-Object {New-ADUser -Name $($_.First + " " + $_.Last) -GivenName $_.First -Surname $_.Last -Department $_.Department -State $_.State -EmployeeID $_.EmployeeID -DisplayName $($_.First + " " + $_.Last) -Office $_.OfficeName -UserPrincipalName $_.UserPrincipalName -SamAccountName $_.samAccountName -AccountPassword $(ConvertTo-SecureString $_.Password -AsPlainText -Force) -City $_.City -StreetAddress $_.Address -Title $_.Title -Company $_.Company -EMailAddress $_.Email -Path $_.OU -Enabled $True}

我们可以使用以下命令来查看新用户及其属性:
Get-ADUser -Filter 'Name -like "*"' -SearchBase "OU=BaseOU,DC=milkyway,DC=local" -Properties * | select name,samaccountname,title,department,city,state,employeeid,userprincipalname,mail,streetaddress
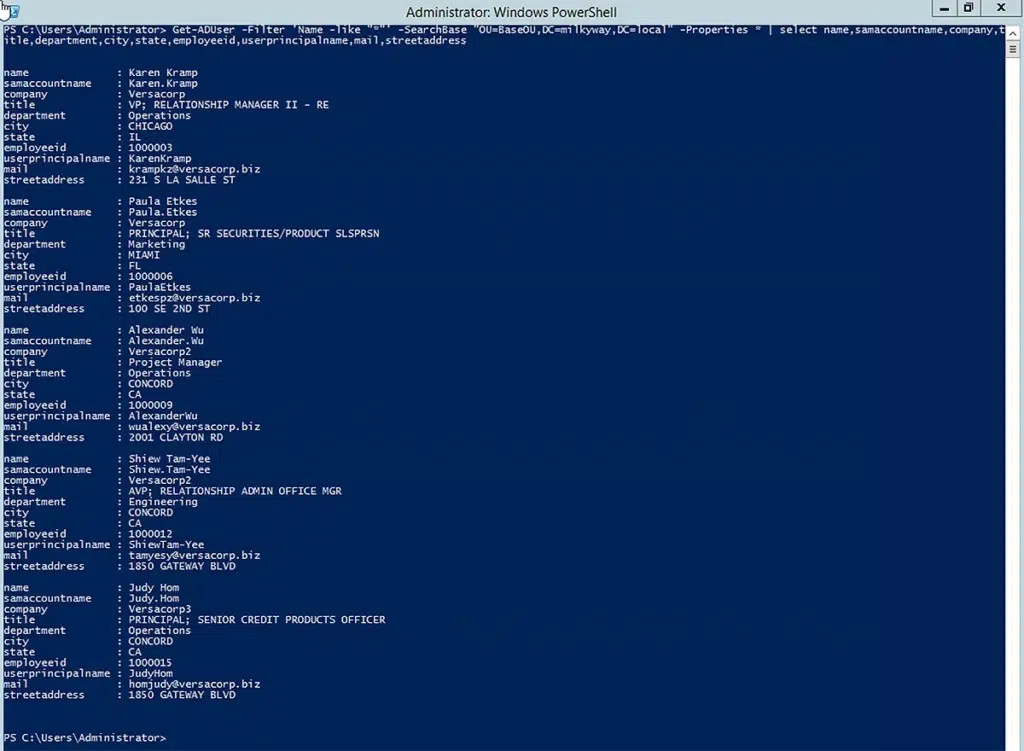
Netwrix 如何帮助在 Active Directory 中创建用户
用户配置(provisioning)是一项永无止境的任务。每天,组织都需要:
- 在 Active Directory 中配置新的用户账户。
- 当用户更改姓名、调换部门等时,更新用户账户。
- 将用户添加到安全组并从安全组中移除用户,以确保他们拥有正确的权限。
- 当用户离开组织时,对其账号进行取消预配并禁用。
此外,为了确保强大的安全性和用户效率,必须准确、可靠且及时地完成所有这些任务。
Netwrix Directory Manager 简化了 Active Directory、Azure AD 和 Microsoft 365 的组与用户管理。特别是,你可以通过与人力资源系统(如 SQL 或 Oracle 数据库)进行自动化的双向数据同步来为 AD 用户进行预配和取消预配。.让我们来看一些展示 Synchronize GUI 的截图。
- 以下截图展示了在 Synchronize 作业中可用作数据源的提供程序。
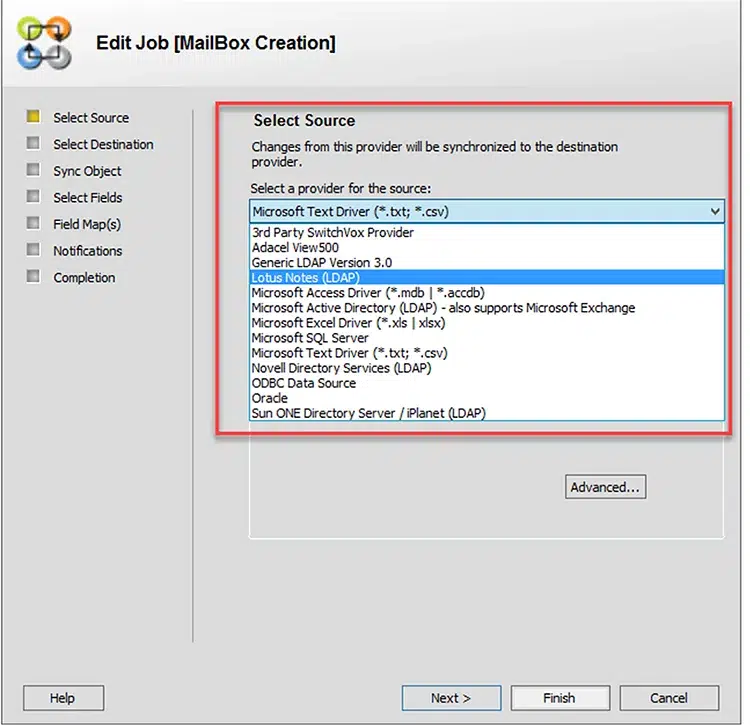
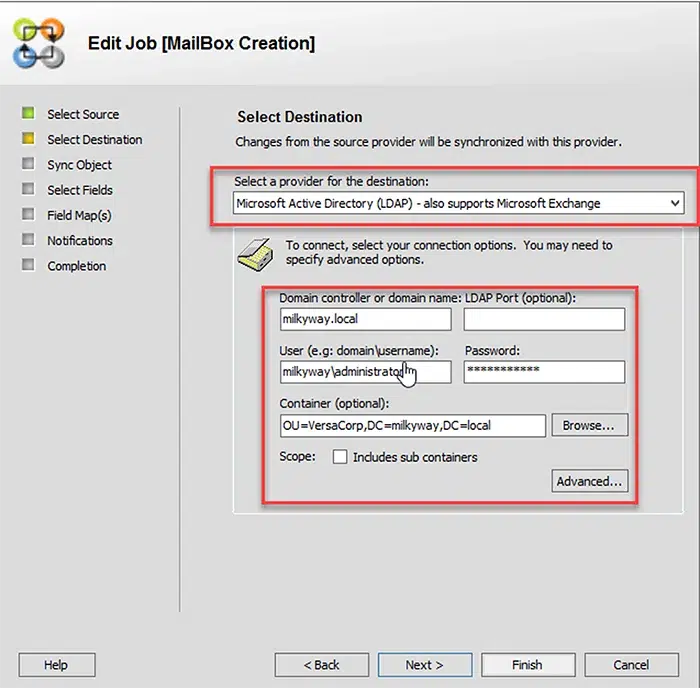
- 以下截图显示,已选择 Active Directory 作为目标提供程序,用于创建用户、联系人、邮箱以及外部邮件启用用户对象。作为源提供程序,可以使用从简单的数据存储(例如文本或 CSV)到复杂的数据存储(例如 Microsoft SQL Server 或 Oracle Server)。
- 下面的截图表明,您可以选择在目标位置创建不同的对象(例如启用邮箱的用户、启用邮件的用户和联系人)。当源提供方发生更改时,您也可以在目标位置更新这些对象。
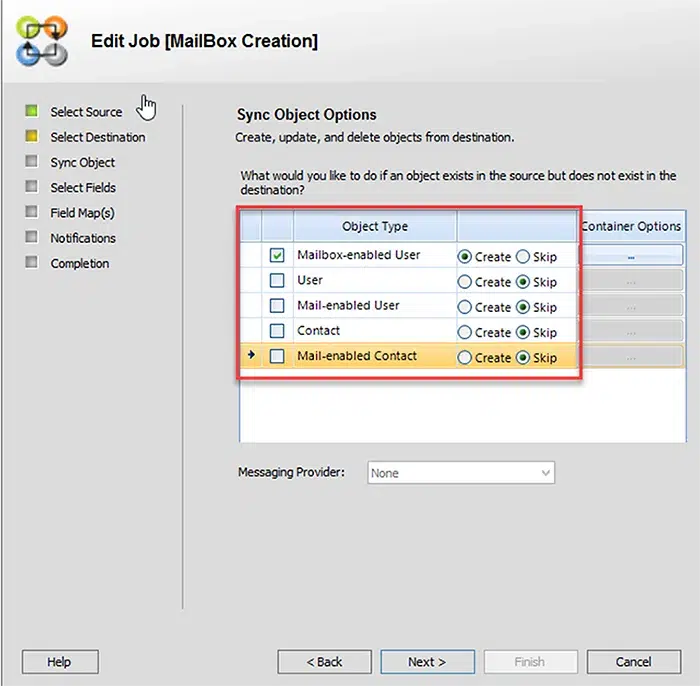
- “创建”(Create)选项按钮可让您在目标位置创建相应的对象。
- “跳过”(Skip)选项按钮可让您在目标位置更新相应的对象。
结论
既然您已经了解了如何使用 PowerShell 在 Active Directory 中创建用户,请在自己的环境中尝试此处展示的命令和脚本,并探索 New -ADUser cmdlet 的更多其他参数。
接下来一定要看看 Netwrix Directory Manager。它结合了 ADAC 和 PowerShell 的优势,通过提供用户友好的图形界面(GUI),帮助你执行并自动化用户的入职(provisioning)和离职(deprovisioning)任务。
常见问题(FAQs)
Q: Active Directory 中的 new-ADUser 是什么?
A: New-ADUser 是用于创建 Active Directory 用户的 PowerShell 命令。
Q:如何使用新的 new-ADUser PowerShell cmdlet?
答: 要使用 New-ADUser,请按需要指定尽可能多的参数,如下面示例命令所示:
New-ADUser -Name "Jason Bourne" -GivenName "Jason" -Surname "Bourne" -SamAccountName "Jason-Bourne" -AccountPassword (ConvertTo-SecureString -AsPlainText “webdir123R” -Force) -ChangePasswordAtLogon $True -Company "Versacorp" -Title "CEO" -State "California" -City "San Francisco" -Description "Test Account Creation" -EmployeeNumber "45" -Department "Engineering" -DisplayName "Jason Bourne" -Country "US" -PostalCode "94001" -Enabled $True
Q: 如何在 Active Directory 中创建新用户?
答: 你可以使用 Active Directory 用户和计算机轻松创建新用户,但你可能无法填充所需的所有用户属性,并且无法批量创建用户账号。更强大且灵活的替代方案是 PowerShell。下面是一个示例,展示如何使用 New-ADUser cmdlet 在 Active Directory 中创建用户并填充许多常见属性:
New-ADUser -Name "Mike Hussey" -GivenName "Mike" -Surname "Hussey" -SamAccountName "Mike-Hussey" -AccountPassword (ConvertTo-SecureString -AsPlainText “Sas123R” -Force) -ChangePasswordAtLogon $True -Company "DeltaCorp" -Title "COO" -State "California" -City "San Jose" -Description "Test Account Creation-2" -EmployeeNumber "46" -Department "Operations" -DisplayName "Mike Hussey" -Country "US" -PostalCode "94089" -Enabled $True
Q:如何在 Active Directory 中创建 1,000 个用户?
答: 你可以使用 PowerShell cmdlet New-ADUser 基于包含每个用户详细信息的 CSV 文件来创建多个用户帐户。更简单的选项是使用 Netwrix Directory Manager,它提供易于使用的向导,并且不仅支持从 CSV 文件导入,还支持 SQL Server 和 Oracle 数据库。
分享到
了解更多
关于作者

Jonathan Blackwell
软件开发负责人
自 2012 年以来,工程师兼创新者 Jonathan Blackwell 一直提供工程领导力,使 Netwrix GroupID 成为 Active Directory 和 Azure AD 环境中群组与用户管理领域的领先者。他在研发、市场与销售方面的经验,使 Jonathan 能够全面理解 Identity 市场以及买家如何思考。