How to Find Permission Changes across File Servers
Netwrix Auditor for Windows File Servers
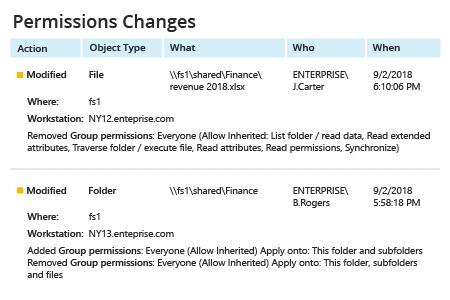
- Run Netwrix Auditor → Navigate to “Reports” → Expand the “File Servers” section → Go to “File Servers Activity” → Select “Permissions Changes” → Click “View”.

- To save the report, click the "Export" button → Choose a format from the dropdown menu → Click “Save”.
- To receive the report regularly by email, click the “Subscribe” button and choose the schedule you prefer.
Learn more about Netwrix Auditor for Windows File Servers
Native Auditing
- Navigate to the required file share → Right-click it and select "Properties" → Go to the "Security" tab → Click the "Advanced" button → Go to the "Auditing" tab → Click the "Add" button → Select the following:
- Principal: "Everyone"
- Type: "All"
- Applies to: "This folder, subfolders and files"
- Advanced Permissions: "Delete subfolders and files" and "Delete"
- Run gpedit.msc → Create and edit a new GPO → Go to “Computer Configuration” → Open “Policies” → Navigate to “Windows Settings” → Select “Security Settings” → Go to “Local Policies” → Select “Audit Policy” → Under “Audit object access”, select the “Success” and “Failure” checkboxes.
- Go to "Advanced Audit Policy Configuration" → Select “Audit Policies” → Choose “Object Access” → Under “Audit File System”, select the “Success” and “Failure” checkboxes → Under “Audit Handle Manipulation”, select the “Success” and “Failure” checkboxes.
- Link the new GPO to your file server and force the Group Policy update.
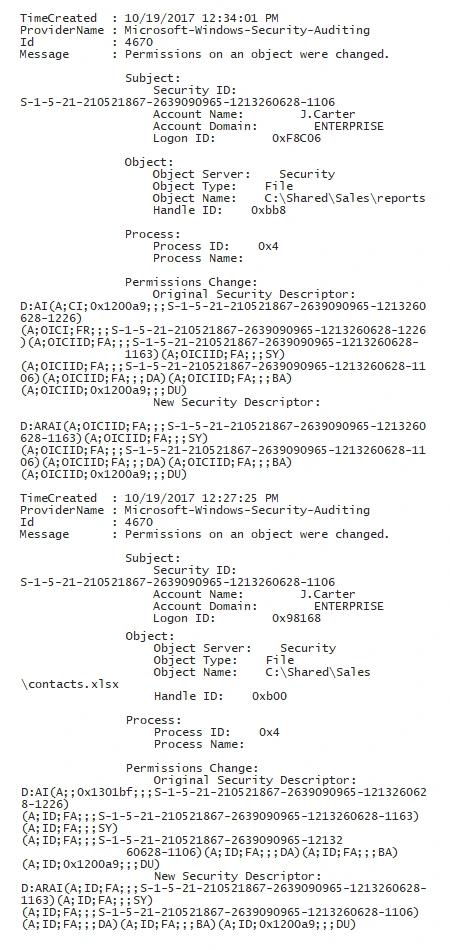
- Open the Powershell ISE → Create a new script with the following code and run it, specifying the name of your file server and changing the timeframe if needed (86400000ms covers the last 24 hours):
Get-WinEvent -ComputerName fs1 -LogName Security -FilterXPath "*[System[EventID=4670 and TimeCreated[timediff(@SystemTime) <= 86400000]] and EventData[Data[@Name='ObjectType']='File']]" | fl | Out-File c:\data\permission_c.txt
- Open the text file produced by the script.

Enable Change Audit of File Server Permissions to Detect Any Privilege Escalation
Privileged users have tremendous power on your Windows file servers. For instance, they can change object access permissions in order to get access to the sensitive data on your file system or file servers. By enabling Windows server audit of permission changes to files, folders and shares you can monitor and control access rights, thereby minimizing the risk of privilege escalation. The first step is to audit object access permissions by writing change events into the Security log, either with Active Directory domain group audit policy, or with the security settings defined in local policies on Windows Server.
Where can you find folder permission changes in the event log? You can either search for event ID 4670 manually, or use PowerShell scripts designed to track changes to security access control lists (SACLs). However, be sure you have extra time at hand, because identifying the before and after values for a change written in security descriptor definition language (SDDL) is no easy task. Is there a better way?
Netwrix Auditor enables object access auditing across your Windows file servers, EMC storage devices and NetApp filers, simplifying your life while giving you peace of mind. The platform delivers visibility into all changes and all access events (both successful and failed) across your file storages. Each change event includes easy-to-read details about who changed which permissions on which files, as well as when and where it happened, so you can detect privilege escalation before any damage is done.
Share on
