Privilege Escalation Auditing in MS Teams and SharePoint Online
Netwrix Auditor for Sharepoint
- Run Netwrix Auditor → Navigate to “Search” → Click “Advanced mode” if not selected.
- Set up the following filters:
- Filter = “Data source”
Operator = “Equals”
Value = “SharePoint Online” - Filter = “Details”
Operator = “Contains”
Value = “Members” - Filter = “Details”
Operator = “Contains”
Value = “Permissions” - Filter = “What”
Operator = “Does not contain”
Value = “ Members” - Filter = “What”
Operator = “Does not contain”
Value = “ Visitors”
- Filter = “Data source”

- Click Search and review your report:
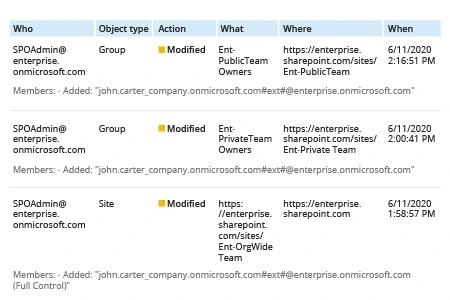
Notes about the report content:- In cases when permissions were assigned directly, the details below the actor’s UPN in the “Who” column will start with “Permissions:” and the permissions granted will be specified inside quotation marks.
- In cases in which a user was added to a group, the details will start with “Members:” and the name of the group is provided in the “What” column.
- To refine your search results further, you can exclude particular groups, sites or actors by choosing undesirable line in results and clicking the Exclude from search button in the Details pane and selecting the result you want to exclude.
Learn more about Netwrix Auditor for SharePoint
Native Solution
- Open the Office 365 Security & Compliance dashboard.
- Go to Search -> Audit log search.
- In the Activities filters, choose “Shared file, folder, or site” and “Unshared file, folder, or site”.
- Click Search.
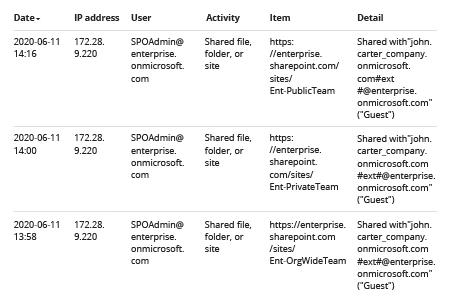
The search results will list the following events: directly granting access rights, adding a user to a group, changing group rights. The output table will include the following basic details:- User — The name of the user who performed the action
- Item — The URL of the SharePoint site or Team where the change was made
- Detail — The user or group to which the change was applied

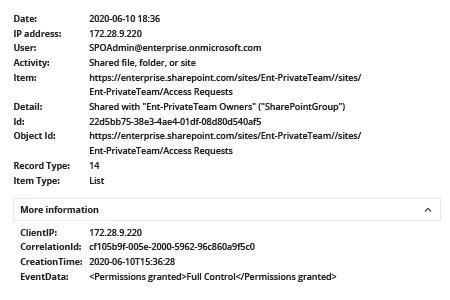
- To determine whether privilege escalation took place, you will have to dig further. One option is to expand the event and review the information by clicking event and browsing through the Details tab. Depending on the activity, you will need to search for the following information:
- If a user was added to a group with Full Control permissions:
EventData: <Added to group> will show the name of the group to which the user was added.
(Note that by default, the group with Full Control permissions for a site or team is named “[SiteName] Owners”.)
- If rights were granted to a user directly: EventData: <Permissions granted> field will show you the permissions granted. Your highest priority is to keep track of users who are granted Full Control.

However, the Audit Log search filter capabilities are quite simple and don’t enable you to exclude irrelevant results, so with this method, you have to click through every single event. An alternative way to find privilege escalation is to parse the data in Excel:
- Output your search results to CSV by clicking Export Results -> Download all results.
- Open a blank workbook ->On the Data tab in the Get & Transform Data section, click From Text/CSV -> Open the CSV file that you downloaded -> Click Transform Data.
- In the Query Editor, right-click the title in the AuditData column -> Click Transform -> Choose JSON.
- In the upper right corner of the AuditData column, click the expand icon -> Click Load more -> Deselect the properties that you don't want to include -> Click OK.
The resulting table will include the following information:- AuditData.CreationTime — The event timestamp
- AuditData.ClientIP — The IP address from which the event was performed
- AuditData.UserId — The name of the user who performed the action
- AuditData.EventData — The action performed
- AuditData.SiteUrl — The URL of the SharePoint site or Team where the change was made
- AuditData.TargetUserOrGroupName — The user or group to which the change was applied
Stay on top of privilege escalation to block threat actors before they cause damage
SharePoint Online and Microsoft Teams enable unprecedented levels of collaboration and file sharing. Users to invite anyone with an email address to join a site or team — including not just internal colleagues but external users like customers, suppliers and contractors — without any help from IT staff.
This self-service model is convenient for users, but it clearly requires IT teams to improve their access control strategies. You need to keep close tabs on who gets access to your environment and be able to quickly spot any escalation of permissions, such as a user being added to an owner group or anyone being granted Full Control permissions for a team or site. For example, if an external user is given Full Control over a site or team, this is a direct threat to your environment, since they can do whatever they want in the site or team, including viewing or deleting the data stored there. For an internal user, privilege escalation can be a sign of malicious intent or account compromise.
With native tools, it’s tough to gain the insight you need to spot and block these threats. The Office 365 audit log records changes to group membership and permissions, but there is no easy way to track these activities — to review the details, you have to either meticulously drill down into each event or download the data into a CSV file and analyze it there.
Netwrix Auditor eliminates the need to spend your precious time painstakingly combing through a mountain of event log entries. With its interactive search, you can easily fine-tune your search parameters and quickly hone in on the relevant events. Plus, you’ll get all the key details right away, including who received new permissions and whether the privilege escalation was the result of a change to group membership or direct assignment.
Moreover, you can easily save your search settings as a custom report you can subscribe to, or use them to create an alert. That way, you can easily stay on top of privilege escalation events in your MS Teams and SharePoint Online environments.
Share on
