
新しい従業員が会社に入社すると、IT 技術者は各アカウントを Active Directory で作成する必要があります。その後、IT 担当者がそれぞれの新入社員を歓迎し、ドメインにログインできるように支援します。この記事では、PowerShell スクリプトを使ってこの手順を自動化する方法を紹介します。必要に応じて、このスクリプトを適宜編集してください。
この記事では、主に次の 3 つのテーマを扱います:
- 電子メールのパスワードを secure string として読み取り、それを暗号化された文字列に変換して、通常のユーザーが読めないようにテキストファイルに保存します。その後、スクリプトがそれを読み取り、secure string オブジェクトに戻して、後続の電子メールメッセージ cmdlet で資格情報(credential)として使用します。
- 過去 24 時間以内に AD に追加された新しいユーザーを特定するスクリプトを作成し、Gmail の SMTP サーバーを使用して歓迎メールを送信します。
- PowerShell を使用して、タスク スケジューラ(Task Scheduler)で毎日午前 12:00 にスクリプトが実行されるようにスケジュールします。
この投稿では、以下の cmdlet を使用しています。各 cmdlet の詳細は Technet の Web サイトで確認できます。
- Read-Host(コマンドラインから secure string を Gmail のユーザー パスワードとして読み取るため)
- Send-MailMessage(SMTP サーバーを使用して電子メール メッセージを送信するための機能)
- Get-Date(現在の日付と時刻を取得するための機能)
- Get-Content(ファイルから暗号化されたパスワードを読み取るための機能)
- Get-ADUser(AD から新しく追加されたユーザーを取得するための機能)
- New-ScheduledTaskTrigger(新しいスケジュール タスク トリガーを作成するための機能)
- Register-ScheduledTask(タスク スケジューラで新しいタスクをスケジュールするため)
このスクリプトは Windows Server 2016 で実行しました。お使いの環境の要件に合わせて編集してください。すべてが動作するように、次の3つの手順に従ってください。
ステップ 1:Gmail のパスワードを暗号化された文字列としてテキスト ファイルに保存する
昇格した権限で PowerShell を開き、次の cmdlet を実行してください。これにより、パスワードを secure string として入力するよう求められ、暗号化された文字列としてテキスト ファイルに保存します。
Read-Host -AsSecureString | ConvertFrom-SecureString | Out-File “C:Userssecurepassword.txt”
ステップ 2:スクリプトを .ps1 拡張子のファイルとして保存する
メモ帳を開き、次のコードをコピーして貼り付けます。ファイルを FindOutADUsers.ps1 として保存してください。
      ##Beginning of functions

Function Send-Email {

Param ($Email, $Credential,$attachment)

$From = "karim.buzdar@gmail.com"
$subject = "Welcome to yourdomain.com"
$SMTPServer = "smtp.gmail.com"
$SMTPPort = "587"

### Beginning of email body

$Body = "Dear User,<br><br>"
$Body += "Welcome to yourdomain.com <br><br>"
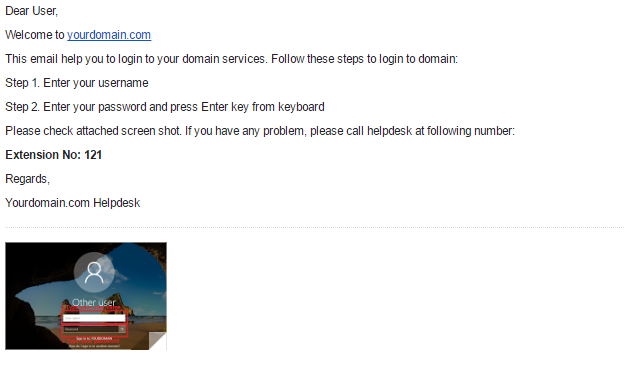
$Body += " This email will help you log in to your domain services. Follow these steps to log in to your domain: <br><br>"
$Body += "Step 1. Enter your username <br><br>"
$Body += "Step 2. Enter your password, and press enter <br><br>"
$Body += " Please check the attached screenshot. If you have any problems, please call the help desk at following number: <br><br>"
$Body += "<b>Extension No: 121</b><br><br>"
$Body += "Regards,<br><br>"
$Body += "Yourdomain.com Helpdesk"

### End of email body

Send-MailMessage -from $From -to $Email -Subject $subject -BodyAsHtml $Body -Attachments $attachment -SmtpServer $SMTPServer -Port $SMTPPort -Credential $Credential -UseSsl

}

### End of Functions

##### Beginning of main function

$When = ((Get-Date).AddDays(-1))
$UserName = "karim.buzdar@gmail.com" #Gmail username which is used for sending an email
$Password =  Get-Content "C:UsersAdministrator.YOURDOMAINDesktopFindOutADUserssecurepassword.txt" | ConvertTo-SecureString  #Reading a secure password from file and reversing it back into a secure string object
$Credential = New-Object -TypeName System.Management.Automation.PSCredential -ArgumentList ($UserName, $Password) #PSCredential for send-mail message cmdlet
$Attachment = "C:UsersAdministrator.YOURDOMAINDesktopFindOutADUsersScreenshot.png" #Image sending as an attachment with email


foreach ($EmailAddress in Get-ADUser -filter {(whencreated -ge $When)} -Properties emailaddress | Select -ExpandProperty emailaddress) #Iterating over each email of users

{

Send-Email -Email $EmailAddress -Credential $Credential -attachment $Attachment

Write-Host "Email sent: $EmailAddress"

}

### End of main function
ステップ 3. タスク スケジューラを使用してスクリプトをスケジュールする
メモ帳で新しいファイルを作成します。次のスクリプトを貼り付けて、.ps1 拡張子で保存してください。
      $Trigger= New-ScheduledTaskTrigger -At 12:00am -Daily #Trigger the task daily at 12 AM
$User= "yourdomainadministrator"
$Action= New-ScheduledTaskAction -Execute "PowerShell.exe" -Argument
"C:UsersAdministrator.YOURDOMAINDesktopFindOutADUsersFindOutADUsers.ps1"

Register-ScheduledTask -TaskName "FindOutADUsers" -Trigger $Trigger -User $User -Action $Action -RunLevel Highest -Force
昇格した権限で PowerShell を使用して上記のスクリプトを実行すれば、完了です!
スケジュールされたタスクが正常に実行されると、Active Directory に新しく追加されたユーザーが次のメールを受信します:
この記事があなたの役に立てば嬉しいです。フィードバックやコメントはいつでも歓迎します。特に、このスクリプトでうまく動作しない部分がある場合は、ぜひ教えてください。頑張ってください!
共有する
もっと詳しく
著者について

Karim Buzdar
サポートエンジニア
ITエンジニアであり、サーバー インフラストラクチャ分野の Microsoft Certified Solutions Associate (MCSA) でもあります。技術著者として、Karim は Microsoft Directory Services と PowerShell に注力しています。